Author Archives: abolte

About abolte

Product keys, DRM, licensing servers, online product activation, adware, spyware, restrictive EULAs... or free software? For me, it wasn't a hard choice. It is all too common for non-free software to come back and bite you on the butt!

ASRock X99 Extreme4 running GNU/Linux

I picked up an old ASRock X99 Extreme4 motherboard from my workplace during an office move a while back which was no longer required by the company. Naturally I put Debian GNU/Linux on it!

It does not use ECC RAM, and I would always see these annoying messages in the kernel logs:

EDAC sbridge: Seeking for: PCI ID XXXX:XXXX

This would be repeated 33 times for different PCI IDs, all of which were repeated 12 times each (for each CPU thread it seems), resulting in 396 such kernel messages for every boot!

Further, each CPU thread would print the following error in red:

EDAC sbridge: CPU SrcID #0, Ha #0, Channel #0 has DIMMs, but ECC is disabled
EDAC sbridge: Couldn’t find mci handler
EDAC sbridge: Failed to register device with error -19.

Clearly the system is attempting to work with ECC which is not configured on this system. Having ECC usage fail is expected, but the logs are very annoying. They get in the way of any messages which might actually be important.

Fortunately, after some trial and error, this was the solution which made all of these pointless messages go away:

echo "blacklist sb_edac" > /etc/modprobe.d/edac-blacklist.conf

If you find yourself in a similar situation with a different motherboard, you can blacklist all edac-related kernel modules used by the currently running kernel by running the following as root (all as one line):

for i in $(find "/lib/modules/$(uname -r)" -type f -iname '*edac*' -exec basename {} \; | cut -d '.' -f 1) ; do echo blacklist ${i} ; done > /etc/modprobe.d/edac-blacklist.conf

Once you have created an edac-blacklist.conf file with one of the above commands, you can have it take effect by regenerating your initramfs file like so (again, as root):

update-initramfs -k all -u

Hopefully someone else finds this information useful.

1400漢字

I’ve been slowly working my way through Heisig’s Remembering the Kanji 1 over the past year, or 13 months to be more precise. My first card (the kanji meaning one, 一) was added 2019-08-17.

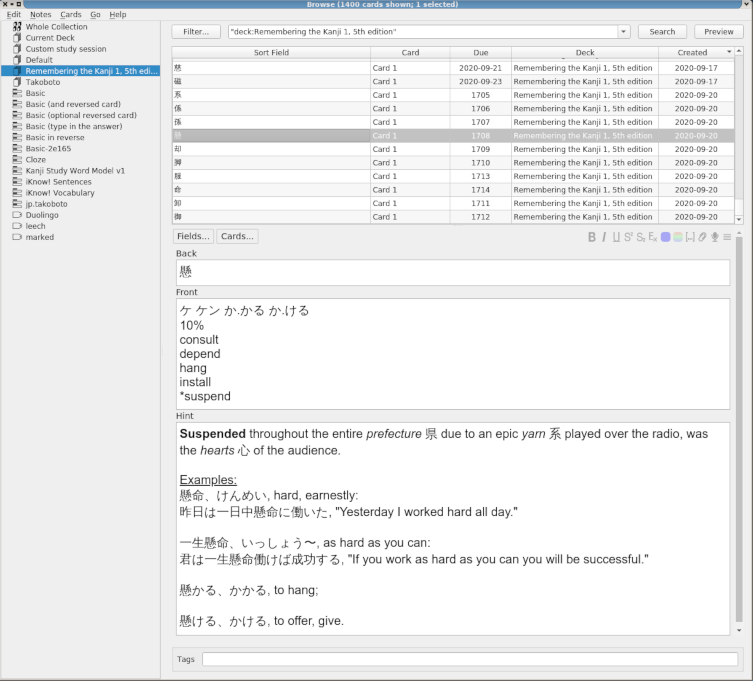
Today marks the day I have added my 1400th character to my Anki deck. My 5th edition book presents 2042 characters, but is far from complete. There is also another book in the series dedicated to additional characters.

I have had people say to me throughout the past year how amazing it is that I have learned to recognise and write hundreds of these kanji, but to me it doesn’t really feel like anything special. An educated native speaker will recognise 3-5,000 kanji, so realistically I’m not even at a half-way point.

Having said that, Japanese students have a huge advantage. They are surrounded by these characters in their daily lives (I’ve never even been to Japan), and they gradually learn these characters over a period of about 10 years. Hence, there is a large barrier to learning Japanese for anyone without pre-existing Chinese character knowledge.

It also helps that when Japanese students learn Kanji, they are at a part of their lives where they can focus entirely on study. In contrast to this, I work full time in an IT job that is constantly working my mind, and find that I’m often too exhausted to focus on study in the evening. It’s worth considering that this endeavour requires a significant mental effort (on top of all the time required to prepare flash cards).

It can be hard to stay motivated and to not burn out. This actually happened to me early in the year, where I felt that I could no longer keep adding kanji to my deck. The required time for reviewing was becoming too great. It was cutting into my sleep time, which meant I was getting more cards wrong. I would then be more tired the next day with even more cards to review, and was just trying my best to hang on until the weekend, where I could catch up on sleep. This approach was unsustainable.

I ultimately stopped adding cards to my deck for over three months (but at least had the good sense to continue reviewing due cards).

The key is consistency, and ensuring your work never becomes overwhelming.

To this end, for the past ~6 months, I have started studying every morning. I’ve never been a morning person before, but sacrifices needed to be made. From the moment my alarm wakes me up, I reach for my phone (with the Duolingo, Anki, Takoboto and Kanji Recognizer apps installed) and just start studying.

I usually get through both my vocab deck (about 10-20 cards), my kanji deck (50-60 cards) and two rounds of Duolingo. If I am reviewing new cards for the first time, I’ll try to pick the easiest Duolingo courses that need “repairing” (Duolingo’s way to get you to review old material) since that is quicker to get through, and new cards must be reviewed twice for the day (meaning I may effectively have up to 69 kanji cards on those days – more on that below).

I write every kanji out in Kanji Recognizer before revealing the answer. Likewise, I write each word in Japanese for vocab cards into Takoboto before revealing the answer. This means I know if I’m correct before revealing the answer in Anki, and permits me to try again. If I am able to get the card correct on another attempt, I’ll mark it as Hard (black) instead of Again (red), which I think causes the review interval to not be extended. This is useful because sometimes I’m wrong just because I mistook one kanji for another with a similar keyword. In the case of vocabulary cards, it is useful because it picks up on small mistakes (eg. using せ instead of ぜ). This means that cards take much longer to complete, but unfortunately Anki doesn’t count this time when calculating the average revision times since the app is in the background while Kanji Recognizer or Takoboto is open – something to be aware of if you enjoy reading your studying statistics.

If I don’t complete all of the above tasks in the morning, I finish them off on my lunch break.

(As an aside, my Duolingo streak is currently at 656. I have been using it for longer than I have been working through RTK, but Duolingo is what initially got me started down this path to learning Japanese. I thank my friend Chris for introducing it to me.)

Once done, I sync my Anki deck, and look at the deck statistics page. If it says I have 50+ kanji cards to review the next day, I’ll consider myself done for the day. However approximately every 3rd day, I’ll find that the reviews scheduled for the following day will have dropped to under 50 cards (for the kanji deck) – in which case I’ll add another 10 characters that night.

I am no longer actively adding vocab cards, but only revising my existing deck of 796 cards (398 words to be translated both ways). Having said that, I am still marking words learned in Duolingo and other sources in Takoboto for later use. For now my focus is primarily on kanji. When I do get back to adding vocabulary, I intend to be smarter about which words I pick to add first, by referencing all the places I have seen the word (that I have separate Takoboto word lists for), and identifying which of those will be the most helpful in future studies (eg. the Genki books, IMABI, etc.).

Creating new Anki cards doesn’t require too much thinking; once you have a process down, it just requires time – for the most part. This is because I find thinking up creative stories to be much easier than memorisation.

I’ll now explain my flash card creation process.

Work-flow to add kanji flashcards to Anki

I use RTK to look at the next character to learn, look at any notes (eg. stroke order, radicals names proposals, etc.) and write the character using the Kanji Recognizer app for Android. I use this to confirm stroke order (where necessary) and to export the card to Anki, along with all the common meanings the character has. I add a * character to the name of the keyword RTK uses (or add the word to the list if it is missing, enclosed in angled brackets so my modification is clearly visible).

I then open Anki and sync the deck to the server, after which time I open the desktop app on my computer.

Screenshot of my Anki deck

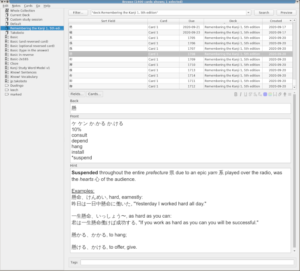
1400th word in Anki with my custom story, for tomorrow’s review.

My desktop will have two apps open, side-by-side; a web browser with the excellent kanji.koohii.com website on the left, and Anki on the right. I then edit the new cards in Anki with custom stories for each of my kanji, with help from the Koohii site. I always try to position the radicals in the story in the written order, use the correct story formatting (with radicals included), and pick (or create) a story that does a good job of reflecting a common meaning of the kanji. Koohii is arguably one of the greatest community resources we students have for those using Heisig’s kanji learning approach. It’s free software (using the AGPL, source code here) and doesn’t cost a cent – so a huge thanks to Fabrice and all the contributors is in order.

Sometimes, I decide that Heisig’s chosen keyword for a character doesn’t fit the example sentences I found (often posted by fellow Koohii users, other times from Jisho or Tatoeba) and will change it. When I do that, I’ll first check the keyword isn’t used later. If it’s not, then I’ll prefix it on the card with a ^ character (instead of a *) to indicate that I have changed it.

Usually it’s very easy to find stories that both fit the characters really well, and are easy to remember. Occasionally it’s quite hard, and I go through multiple iterations before I end up with a story I’m satisfied with. Despite this, I’m confident that creating custom stories will save time in the long run. Sometimes I make small tweaks to the stories later while doing reviews (switching to the Hacker’s Keyboard helps greatly when editing the HTML on a phone) but that’s quite rare.

So that’s pretty much my entire approach to learning Japanese at this point. Of course I do end up reading a bit on grammar and the like on weekends where I have more time, but kanji will remain my primary focus for the better part of the next year. This approach ensures I am never overwhelmed, or find learning Japanese to be a burden. It works out to be a little over 3 new kanji per day, which to many probably feels too slow, but it’s difficult to do many more when time is limited. To be a serious learner, many reviews are required to successfully transition cards into long term memory.

For someone studying full time (or even part time) with a teacher as part of a class, this approach will likely not work. The teacher will probably impose a kanji learning order which doesn’t necessarily build upon previously learned radicals in the way that RTK does. There will probably be exam schedules and deadlines to meet. Likewise, people who primarily want to focus on passing one of the JLPT exams may grow impatient. Alternative learning approaches commonly used in these scenarios that introduce kanji based on popularity (instead of radicals) should ultimately require more hours to effectively accomplish the same thing. On the flip side, such students will meet their short term goals sooner, and would generally have more time to allocate to their endeavours.

I look forward to being able to look at a page of Japanese text at some point next year, be it an e-mail, a website, a news article or what have you, and even if I can’t understand or pronounce everything, know that there’s nothing there that I haven’t seen before and can’t easily look up.

To finish learning all the kanji from Heisig’s books will be great first step to learning Japanese, but this is still the beginning of my long journey.

HP 14-AF113AU 14″ Notebook initial impressions

Last week, I was unfortunate enough to have my Asus UX31A laptop stolen from my apartment. Fortunately I use LUKS full disk encryption for all my machines, so I don’t need to worry much about data loss, but it’s still quite infuriating to be in this situation. I’m on call 24×7, and I need a reliable light-weight machine I can take with me anywhere so I can quickly react to production IaaS and application issues should they arise.

Previously I used a AMD E-350-based Sony Vaio laptop which I acquired in 2011 and upgraded the RAM to 8Gb and swapped out the HDD for an SSD. Unfortunately due to the lack of AES support, running LUKS on it was painful. Ultimately I reached the breaking point this year when my workplace required me to run more and more JS-heavy web apps such as Slack and Trello, and then asked me to log into Slack in the event of an outage to keep them updated. Previously I’d just fire up Pidgin and connect to the work-hosted XMPP service in just a few seconds, but Slack (even with a dedicated client such as ScudCloud) would take longer to load and connect than the entire time it took to boot the laptop to the desktop – all the while making the machine too slow to do anything else! Ridiculous! But perhaps that’s a topic for another post.

For a time I was considering the MSI GS30 Shadow, but ultimately my spouse decided to hand me down the UX31A which otherwise wasn’t getting much use. With that stolen, and the AMD E-350 too slow, I found myself once again in the market for a new laptop – only without much of a budget since it wasn’t something I was planning for. :/

You have probably inferred from the title of this post that I eventually decided on the HP 14-AF113AU, so I’ll detail how I came to that conclusion. My priorities were (roughly in order):

1. Works well with free software, such as GNU/Linux.
2. Lightweight. I need to carry this with me anywhere and everywhere. If I go to the supermarket, it’s in my backpack. If I use it to work, I’m carrying it in my bike pannier.
3. No bigger than 14″. It’s unlikely anything bigger than that would fit in my bike pannier, and I didn’t want to risk it.
4. CPU power (preferably 4 cores). Must have extensions for AES support, as the lack of AES was one of the reasons my AMD E-350 was so slow. I wasn’t about to make that mistake again.
5. Cheap! I was hoping for something under AU$500. I could probably have stretched this to $600 if there was a significant advantage in doing so, but under $500 was the goal.
6. Upgradeable RAM, storage, wireless.
7. Screen resolution.
8. Bluetooth. I generally tether to my phone in case of emergencies when I’m out, and Bluetooth is my preferred way to do that. It uses less power than Wifi, which is important if I don’t have a spare charger with me. A lot of wireless headphones also rely on Bluetooth these days, and I hate needing to use dongles.
9. USB 3. USB 2 is just too slow when transferring data to external SSD devices.
10. At least 3 USB ports. It wouldn’t matter much for use on the go, but having an external keyboard, mouse and room for at at least one USB drive would be ideal.
11. Gigabit Ethernet, with the RJ-45 port built-in (as opposed to a USB dongle). As an administrator, I have to troubleshoot patch Ethernet cabling every now and then, and having to bring a set of dongles everywhere just in case proved to be one of the major annoyances of the UX31A.
12. Taiwanese brand. American branded machines have a tendency to be dumbed down to the point of being useless – particularly in the BIOS. Contrast that to MSY, Asus, Gigabyte, etc and you’ve have a plethora of options and features. American brands also in my option/experience (especially Dell) seem to have a greater tendency to rely on Windows software to make the hardware work or to install firmware upgrades – an issue I’ve yet to run into with Taiwanese branded hardware. Last but not least, American brands have a tendency to require same-brand or approved hardware for compatibility. This includes memory modules (Apple), wireless cards (HP), etc. Taiwanese brands never pull that crap – at least not that I’ve ever encountered.

Things I didn’t want to deal with included:

1. Dead or stuck pixels.
2. Low resolution.
3. Dongles to connect to an external monitor.
4. Ordering hardware. I wanted something I could grab off the shelf at a local store, since I wanted something immediately and I don’t trust items posted to me directly. We know the NSA (for example) intercepts computer hardware and install bugs that are heat-injected into the plastic (making it hard to spot even if disassembled and you know what to look for), so my policy is to only purchase hardware that I can buy off the shelf with no advanced notice. It has the added bonus of supporting local businesses.

Things I didn’t care about included:
1. Size. As long as the laptop fits in my backpack and bike pannier and is easy to carry and lightweight, the laptop could be 7″ for all I cared.
2. The operating system. I was going to replace it with Debian GNU/Linux or something anyway. Obviously it would be best to not be paying for something I wasn’t going to use.
3. Optical drives. I’d likely never need to use one, the main exception being the occasional blu-ray disc (which I likely wouldn’t get for the price range I was looking at). An internal drive would unnecessarily add weight.
4. The hard drive size (assuming it was replaceable). For the price I wasn’t expecting an SSD, and the plan was to pull the SSD out of my old Sony E-350 if possible.

All things considered, this HP model did reasonably well at meeting my requirements. It’s just under 2kg (and 2kg is where I draw the line). I’d rather not it not have an optical drive and be ~300g less, but I decided it to be acceptable. Interestingly, lighter laptops seem to be either very cheap (and too weak to be much of an upgrade over the E-350), or quite expensive.

As mentioned, I care more about screen resolution than screen size (provided the screen is no bigger than 14″). Sadly the HP only has a resolution of 1366×768, and this is very hard to deal with to be honest. Having gotten quite used to the 1920×1080 resolution of the UX31A (which has a smaller 13.3″ panel), the HP screen looks absolutely awful. Unfortunately, the sales guy said FHD laptop resolutions only started at around the AU$1300 price bracket, which was more than double what I could possibly spend. It’s doubly unfortunate that the screen is glossy, and I’d much prefer a matte finish. I don’t need a mirror for a screen!

JB Hi-Fi advertises an asking price of $498, however I was able to get the sales guy to bring that down a bit to $484. That probably made this the cheapest quad-core laptop of those that are upgradeable. How did I know it was upgradeable? The mechanical HDD is generally a dead giveaway. Sure the sales guy said it couldn’t be upgraded due to not having a back panel section that could be unscrewed, but I suspected I could still do it by disassembling the entire thing – and I was right! As an aside, I was also pleasantly surprised to find a second empty RAM slot – potentially allowing me to upgrade from 4Gb to 16Gb!

The sales guy informed me that this had Gigabit Ethernet, but it doesn’t. Based on the output of the lspci command, it uses a RTL8101E/RTL8102E PCI Express Fast Ethernet controller. Not a deal-breaker, but quite disappointing. There’s no excuse for not having Gigabit on even the cheapest of laptops – if you’re going to add a RJ-45 Ethernet port anyway, make it useful please! As it stands, the 802.11n wireless is probably faster in general – although that remains to be seen.

The AF113AU does have a USB 3 port, and two USB 2 ports. It’s disappointing that all ports aren’t USB 3, as one has to remember which port is which. Unfortunately HP decided not to bother following convention by marking that port blue, so I had to look through the manual to figure it out.

I failed to get a Taiwanese brand such as Asus or Gigabyte, but hopefully HP doesn’t give me too much trouble. Perhaps the days of HP white-listing wireless cards are over? I’ll probably find out eventually, as the module included uses a Broadcom BCM43142 802.11b/g/n chipset – quite painful to setup. See here for a peek at a guide, but basically it appears to require non-free heavily-restricted firmware to function. The firmware is not freely distributed, so you need to use a script to download a file and extract the firmware files. Ugh! Unfortunately I know of no wireless/bluetooth combo module that’s 100% free software friendly, and I need Bluetooth to tether to my phone during emergencies.

I was lucky to have no dead or stuck pixels on this machine. I say “lucky” because apparently you need at least 3 stuck pixels before you are eligible to return the laptop under warranty, and I was not given the option to inspect the screen before purchase.

The machine requires no dongles to operate. All supported video and data connectors are built-in, which is ideal. I would rather have a laptop that’s 5mm wider and not require dongles do connect everything. It’s also surprising that the machine has a built-in DVD burner. This is absent in the product page image. The drive can easily be replaced with something else (such as a blue-ray drive or an empty caddy) by undoing a single screw and sliding the drive out, however one would have to research which drives would be compatible with the slot.

Another surprise was the size of the 500G Seagate HDD – the thinnest I’ve seen to date. The Corsair Force 3 SSD I replaced it with is about 1 or maybe 2 mm taller, but fortunately still fits (just).

Being an A4-5000 APU, the laptop sports Radeon HD 8330 graphics (which uses the radeonsi Mesa driver) and should offer reasonable performance for the price. So I find it odd that the machine doesn’t have an AMD logo on it anywhere. All Intel machines in the store seemed to have an Intel logo – including machines that weren’t an Atom/i3/i5/i7. It’s as if HP was ashamed of the APU in this cheap laptop, but there’s no reason for it that I can immediately see. Perhaps it doesn’t run Windows 10 (which it came with) so great? Weird.

Well, I wouldn’t know anyway – I swapped the HDDs before I ever booted the 500Gb. Then I backed up the perfectly clean factory default image to an external backup drive, which I’ll later compress, split and burn it to a set of DVDs – good to restore to its original state if ever I need to return the machine under warranty. I’ve been following this same procedure for my last few laptop purchases. Finally I wiped the 500Gb drive and put it into my old Sony (as perhaps one day I’ll find a use for it).

The keyboard is surprisingly nice to type on, with good feedback that a key has registered. Normally I use mechanical keyboards which are amazing, but the HP keyboard wasn’t too bad for what it is. Home/End/Page Up/Page Down/Insert/Delete/Print Screen are all dedicated keys, with fn shortcuts being reserved for non-standard keys such as multimedia buttons, backlight and volume adjustments and wireless and external monitor toggle switches. I feel this was a wise move by the people at HP, as it was always annoying on other machines having to remember the correct fn+button key combinations to navigate documents (for example). One thing I didn’t like about the keyboard was the decision to make the up/down navigation keys half-size, and the left/right keys full size. This just feels weird, unnatural, and I keep pressing the wrong buttons. HP had plenty of space to make all of the buttons full-size if they wanted to, but it feels like they took a page from Apple’s play-book and decided on aesthetics over practicality (but even Apple makes the arrow keys consistent at half-size at least!).

While I’ve yet to test the SD card reader, HDMI and VGA outputs, optical drive and webcam, everything seems to be working (with a bit of effort in the case of the Broadcom wireless chipset) and I’m reasonably satisfied. If the wireless chipset didn’t need such a horrible proprietary firmware blob, the Ethernet was Gigabit, the optical drive was blu-ray (or otherwise didn’t exist), the laptop was easier to upgrade and the screen was slightly better… oh and obviously if GNU/Linux was an option (or at least if Windows was optional)… this would be one really neat machine. But it’s not horrible. Despite the flaws, I’m at least impressed with the price. I may write a review after I’ve used it for a while and put it through its paces.

Customising XDM for the modern desktop

As per my previous blog post, I’m now using XDM as a login manager. By default, it looks like something straight out of the ’80s. Having said that, it’s not too difficult to give it additional functionality ad make it look nice. With the help of this tutorial, I was able to put together the following:

My custom XDM theme.

My custom XDM theme.

As per the linked tutorial, I have used an embedded xmessage window to create the Shutdown and Reboot buttons.

In order to recreate this setup, you will need to do the following:

  1. Drop the meditate-black-bottom_right.png wallpaper into /etc/X11/xdm/.

    This file can actually be references from anywhere, but it makes sense to me at least to keep it all together.

    The wallpaper was taken from the FSF’s wallpaper section (specifically here) and is distributed under either the GPL3+ or GFDL1.1+ (with no invariant or front/back-cover texts). I just slapped it on a black 1920×1080 background and exported it as a PNG. I then load this as the XDM wallpaper via xloadimage. Note if you are doing your own modifications (perhaps to change the colour or resolution) that xloadimage will only render transparent pixels as white, and there is no built-in option to change this.

  2. Edit /etc/X11/xdm/xdm-config and replace the following lines:

    DisplayManager*resources: /etc/X11/xdm/Xresources becomes DisplayManager*resources: /etc/X11/xdm/Xresources_custom

    DisplayManager*setup: /etc/X11/xdm/Xsetup becomes DisplayManager*setup: /etc/X11/xdm/Xsetup_custom

    and

    DisplayManager*startup: /etc/X11/xdm/Xstartup becomes DisplayManager*startup: /etc/X11/xdm/Xstartup_custom

    We need to create the Xresources_custom, Xsetup_custom and Xstartup_custom files in the steps that follow.

  3. Create /etc/X11/xdm/Xresources_custom.
    This is basically the same as Xresources, only with some additional lines appended to the end. It can be created with the following two commands:

    # cp -f /etc/X11/xdm/Xresources /etc/X11/xdm/Xresources_custom
    # echo "
    
    Xmessage*geometry:              170x27+20+20
    Xmessage*background:            black
    Xmessage*foreground:            red
    Xmessage*Font:                  -xos4-terminus-*-r-normal-*-*-180-*-*-*-*-*-*
    Xmessage*borderWidth:           0
    
    Xmessage*message.scrollVertical:        Never
    Xmessage*message.scrollHorizontal:      Never
    Xmessage*message*background:            black
    
    Xmessage*Text*background:       white
    Xmessage*Text*foreground:       red
    Xmessage*Text.borderColor:      black
    Xmessage*Text.borderWidth:      0
    Xmessage*Text*font:             -xos4-terminus-*-r-normal-*-*-180-*-*-*-*-*-*" >> /etc/X11/xdm/Xresources_custom
    

    This assumes you have the Terminus font installed. If you don’t have it, you can either install it through your package manager or alternatively fire up xfontsel and select something else that works for you.

  4. Create /etc/X11/xdm/Xsetup_custom with the following contents:
    #!/bin/sh
    #
    # This script is run as root before showing login widget.
    
    #--- set a fullscreen image in background
    xloadimage -onroot -quiet -fullscreen /etc/X11/xdm/meditate-black-bottom_right.png
    
    #--- set Shutdown/Reboot buttons
    (
    xmessage -buttons Shutdown:20,Reboot:21 "" ;
    case $? in
        20)
    	TERM=linux openvt -c 1 -f /usr/bin/clear
            exec openvt -c 1 -f -s -- /sbin/shutdown -hP now
            ;;
        21)
    	TERM=linux openvt -c 1 -f /usr/bin/clear
            exec openvt -c 1 -f -s /sbin/reboot
            ;;
        *)
            echo "Xmessage closed on $(date)"
            ;;
    esac
    ) &
    

    Fix the path to the image in the xloadimage command if you placed the file (or a different background image) elsewhere.

    Notice we use the openvt command to switch to the first virtual console for the purposes of executing the shutdown or reboot commands. This is because (on Debian Wheezy at least), terminating Xorg with XDM running will switch you back to the first virtual console, so you’ll need the output printed there if you wish to see anything during the shutdown sequence.

  5. Create /etc/X11/xdm/Xstartup_custom with the following contents:
    #!/bin/sh
    #
    # This script is run as root after the user logs in.  If this script exits with
    # a return code other than 0, the user's session will not be started.
    
    # terminate xmessage
    killall xmessage
    
    # set the X background to plain black
    xsetroot -solid black
    
    if [ -x /etc/X11/xdm/Xstartup ]; then
      /etc/X11/xdm/Xstartup
    fi
    
    # vim:set ai et sts=2 sw=2 tw=0:
    

    As can be seen from this last few lines, we still re-use the contents of the original Xstartup script, so keep that around if using these scripts as is.

  6. Finally, make sure the new files have the correct permissions. Xresources_custom only needs to provide read access, but Xsetup_custom and Xstartup_custom should be executable.

    # chmod 0644 /etc/X11/xdm/Xresources_custom
    # chmod 0755 /etc/X11/xdm/Xsetup_custom /etc/X11/xdm/Xstartup_custom
    

And there you have it, and beautiful-looking XDM setup, that runs extremely fast but still includes the shutdown and reboot buttons.

How to replace LightDM with XDM in Wheezy

My machine is an Asus G55VW laptop, and it seems to have a very annoying UEFI or Nvidia driver bug. Even under Windows (which the laptop came with), everybody with this model is experiencing odd behaviour – the laptop will fail to detect the display properly in certain situations and attempt to output the screen to an external monitor – even if nothing is connected! Under Windows 8.1, this means the login screen isn’t displayed, and one must press Meta+P, hit the down arrow once or twice, and press enter (and do this until the internal laptop screen is activated). It’s absolutely horrible, and has only showed itself in the Windows world upon upgrading to Windows 8.1.

On Debian with LightDM however, I have experienced what I believe is this same issue (based on Xorg log file analysis) ever since I brought home the machine. Unlike Windows, I can login okay. However logging out of XFCE to the LightDM display manager causes the internal laptop screen to not be detected correctly during the switch. The result is a blank screen, and LightDM has no way (AFAICT) to switch display output via a shortcut when it’s already running. Further, it even prevents switching to a virtual console as no image will reappear if I hit Ctrl+Alt+F1 for example (which shouldn’t ever happen without explicitly disabling it in the Xorg config at least, which I certainly haven’t). The only option in such a situation is to switch to a virtual console and blindly hit Ctrl+Alt+Del and wait for the UEFI screen to appear.

Until recently (when Windows was upgraded to 8.1 and showed similar symptoms), I had always attributed this behaviour to a bug in Wheezy (since I purchased the laptop around the time Wheezy was being marked as stable so it could not have been tested on this model) and assumed it would be solved in time with Jessie, but now I’m not so sure. Rebooting the machine is very quick (the longest part easily being the lengthy passphrase required for cryptsetup) – quick enough that I’ve never bothered getting to the bottom of it, particularly since I can generally avoid hitting the problem in the first place since I’m so familiar now with what triggers it. However now I’m seeing such odd and annoying behaviour from both operating systems, it’s time to do something about it.

The only reliable way to avoid this is to activate CSM in the UEFI (to mimic BIOS functionality), but that has a number of drawbacks. The boot output resolution is restricted to VESA modes, which look horrible on a 1920×1080 display (especially when UEFI detects the resolution perfectly and looks beautiful). It also means I can’t use the rEFInd boot manager, which I now much prefer over GRUB on desktops and laptops. CSM also prevents enabling “Fast Boot” in the BIOS, which introduces a small but unnecessary delay. Indeed, enabling CSM feels like a significant step backwards, so I will try to avoid that wherever possible.

I’ve tried GDM3 temporarily, and that had the same issue at first. However I found that pressing fn+F8 (the LCD/monitor switching/toggle button) surprisingly worked and brought the picture back so I could see the login prompt. It even seemed to remember this setting somehow as I was never able to reproduce the issue with GDM3 after that. I thought that was the end of this dilemma and I could get back to doing something else. Unfortunately GDM3 had other issues.

Firstly, upon wearing headphones during login I was able to hear my laptop internal microphone was active via a loud hissing noise, and confirmed this by tapping the mic. I could find no way to turn this off, and could not think of any reason why GDM3 would be doing that. Secondly, I didn’t like the user accounts listed for selection. I wanted to type my username, as there is no reason to make the login name unnecessarily obvious. There was an option in the GDM theme config to allow this, but it wasn’t reliable. If I started entering my username and hit Escape or Ctrl+C (with the expectation that I could clear the box in the event of a typo), the login window would disappear completely and I’d have to reboot. Yuck!

But the worst issue of all, GDM3 was just too slow to keep up with my typing speed! I would type in my username, hit enter or tab, and then start typing in my password. Only the password would be missing the first few characters since the password box had not properly appeared yet. Even after all of that, there was a noticeable delay in launching my XFCE desktop. I can only imagine what it was doing with those CPU cycles.

So looking around at other display managers packaged in Wheezy, I found two suitable options – SLiM, and XDM. I didn’t know much about SLiM. I knew XDM was about as bare-bones as one could get, I knew it was fast, and I knew it required manually typing the username… it seemed to be the way to go, so I set out to make that happen.

$ sudo apt-get install xdm

I selected XDM to be my default login manager, rebooted, and there it was in all its glory. There were some things missing however – no X session manager list to choose from (which is perfectly fine), but also no shutdown and reboot options. I could live without those, although I still expected it would be a minor inconvenience. I was happy with the speed of the prompts – it felt slightly quicker than LightDM (that is, probably no perceivable delay). However XFCE spent about 20 seconds to appear. When it had finally loaded, some issues were encountered. For one thing, USB mounting wasn’t working. Manually clicking the mount button in Nautilus caused a “Not authorized” error to be displayed, with no hint as to why. The USB drives didn’t automatically mount via my usb_mass_mount.sh script either. I eventually noticed that even Network Manager wasn’t working!

Was all of this because I was using XDM? Some quick web searches for “Debian xfce xdm” indicated as such. Was it worth trying to fix it? I logged out of XFCE (observing as I went that even the reboot, shutdown, suspend and hibernate options were either missing or greyed out) and XDM continued to output to the correct monitor. Whatever this issue is with my model of laptop, XDM is not affected. With this and it’s impressive text entry speed, I decided these XDM issues were worth looking into.

What followed was a lot of careful analysis of the scripts under /etc/X11/Xsession.d/, and much research into what was causing this. Essentially, this can all be fixed with two or three minor changes – but they are amazingly difficult to figure out if you’ve never looked into the related technologies before.

PAM
In /etc/pam.d/common-session at the bottom of the file, there is the line “session optional pam_ck_connector.so nox11“. From the pam_ck_connector(8) man page, the nox11 argument tells the PAM module to not create a session if PAM specifies an X11 display instead of a /dev/tty terminal. I guess the assumption is that the display manager will handle this automatically, but XDM is too primitive to have ConsoleKit support. Hence remove that nox11 bit from the line. I actually like to copy the line, modify the copied line and then comment out the original, so such changes are slightly more obvious and easier to undo if I ever need to revert. Alternatively, take a backup. :)

Xsession
Our session needs to be started with /usr/bin/ck-launch-session. This is supposed to happen from /etc/X11/Xsession.d/90consolekit when it’s required, but it’s broken and needs to be fixed. There are a few ways to do this. Ideally I would have found a way to just bypass this script entirely (replacing the functionality with something in my home directory) but any fix would involve some kind of modification under /etc/X11 somewhere that I figured it best to just fix this at the root of the problem. Here is my patch:

--- 90consolekit.orig	2015-02-04 17:42:07.549621276 +0800
+++ 90consolekit	2015-02-04 17:41:25.021379155 +0800
@@ -24,9 +24,17 @@ is_on_console() {
 	fi
 }
 
+is_xdm() {
+	if [ "$(pgrep -cfx /usr/bin/xdm)" -ge 1 ] ; then
+		return 0
+	else
+		return 1
+	fi
+}
+
 # gdm already creates a CK session for us, so do not run the expensive D-Bus
 # calls if we have $GDMSESSION
 if [ -z "$GDMSESSION" ] && [ -x "$CK_LAUNCH_SESSION" ] && \
- ( [ -z "$XDG_SESSION_COOKIE" ] || is_on_console ) ; then
+ ( [ -z "$XDG_SESSION_COOKIE" ] || is_on_console || is_xdm ) ; then
     STARTUP="$CK_LAUNCH_SESSION $STARTUP"
 fi

Seems to do the job. Doesn’t break compatibility with startx (presumably – my laptop display doesn’t seem to work with that either so can’t verify) or other display managers since it specifically tests to see if XDM is running.

usb_mass_mount.sh
My lovely USB automatic mount script has been intermittently failing since switching to XDM, and it wasn’t immediately obvious why since it only failed during login and could not be reproduced afterwards. I quickly discovered that the udisks command was also actually returning a Not authorized error (the same as was observed from Nautilus prior to the above fixes) – something I did not encounter under LightDM. AFAICT, the login is so fast now that it tries to run before ConsoleKit has properly initialized! I simply added in a 0.1 second delay (because as programmers know this always fixes everything), and now it’s working perfectly again.

# Mount all USB block devices that have a filesystem label.

for device in $(find /dev/disk/by-path -name '*usb*' -exec readlink -f {} \;)
do
    if [ -b "${device}" ] && blkid "${device}" | grep -q LABEL
    then
        if ! mount | grep -q "^${device} on "
        then
            ( 
                sleep 0.1
                udisks --mount "${device}"
            ) &
        fi
    fi
done

And there we have it, a lightning fast XDM login screen, and now I can actually log out and in again as well!

Automount USB devices on login

There’s an issue I’ve been wanting to sort out for over a year, but it’s one of those niggling annoyances that’s just hard enough to find an elegant solution for that encourages me to keep putting it off. Well no more! I’ve finally got this problem licked.

So to clarify my situation, I have an external USB HDD for my laptop with a bunch of large games on it and the like, which won’t fit on my laptop internal SSDs. I run Xfce, and I have the option under Removable Drives and Media labeled Mount removable drives when hot-plugged ticked, and this works as the developers intended.

Xfce 4.8 option to mount removable drives when hot-plugged.

Mount removable drives when hot-plugged.

The problem is that I don’t lug this largish laptop around too much with me, so the USB HDD remains connected most of the time. When I power up I can see the device under Thunar and Nautilus, however it is not mounted. I need to manually click on the drive for that first. The reason being is that the device was not hot-plugged after Xfce was loaded – it was already connected when I logged in. Having to open a file manager and click the drive before I can use it after each reboot is, well… not ideal.

I’m aware one option could probably be to just add an entry to my /etc/fstab file to automount this if the device exists on boot, but I don’t like that for two reasons. Firstly, I might want to use a different HDD (or multiple HDDs) in the future. I don’t want to have to edit my /etc/fstab file for every HDD, SD card, USB stick or whatever. Basically, if a device is already inserted, and I’ve given it a filesystem label (so the filesystem is able to be mounted with a fixed mountpoint name under /media/ as per usual hot-plug USB mounting), I want it automatically mounted by the time I’m logged in. In the event a device does not have a label, I don’t want it automatically mounted since it may not have an obvious name or even a fixed mountpoint automatically created for any kind of automount to be meaningful. Since I don’t know what devices I’ll connect in the future, simply adding /etc/fstab entries won’t suffice.

Secondly, I want filesystems that do not have permissions (or permission support under GNU/Linux) to be mounted as the user currently logged in. If my spouse (for example) logs into my laptop with her own account and wants to plug in an NTFS or FAT32 formatted device, she should be able to do so without permission trouble. If /etc/fstab had mount permissions set to allow only my user account access, it would present problems. Conversely if she did have permission, it would mean either /etc/fstab also allowed my login access to the device as well (via group permissions) – probably not ideal for privacy, or permissions were so relaxed that any user on the system could access the device (eg. a 0000 umask) – a significant security risk!

After a bit of searching around the web, I decided the udisks command in the udisks Debian package was the way to go. As this package is a dependency for the xfce4-power-manager package, as an Xfce user I already found this to be installed. I also looked into pmount (which did not create entries under /media/ automatically using the device filesystem label), and usbmount which is no longer maintained, and (according to the Debian wiki page) should not be used if you want a desktop icon, and also apparently has the same issue pmount has (ignoring filesystem labels for use as mountpoint names). I wanted the behaviour of manually clicking the drive icon in the file manager mimicked as closely as possible, and udisks seems to do just that.

Unfortunately, udisks does not have some kind of “mount all” option. It does tell you which devices are connected via USB (via the --dump argument) but that did not look so easy to parse (and I wouldn’t be surprised if this output formatting changed when upgrading or replacing distributions that might include a new udisks version). Instead, I noticed looking under /dev/disk/by-path/ that USB devices had -usb- as part of the symlink name – be it the raw block device or a partition. This looked good enough to me, so I used that.

$ find /dev/disk/by-path -name '*usb*' -exec readlink -f {} \;
/dev/sdc1
/dev/sdc
$ 

I typically partition all my devices, including USB sticks. Still, I wanted a solution that would detect the correct device to mount regardless. I thought about using file -s <devices> but that requires either raw block device access (which seems too risky) or having the ability to automatically run the file command via sudo without a password. Running file on untrusted code is in some ways even more risky, given this can trigger code execution, as I recall. I would also prefer to have a self-contained solution – and by that I mean no changes outside of my home directory, and not something that changes my setup globally. I should be able to understand everything going on just by having common knowledge of how a distribution is put together and looking in the one spot.

In the end, I determined blkid would be helpful. It does not require root privileges, should exist on pretty much any system (as it’s included in the util-linux package), and can easily identify block devices with a filesystem label – which is all I’m actually interested in anyway. So here’s the solution we end up with:

# Mount all USB block devices that have a filesystem label.

for device in $(find /dev/disk/by-path -name '*usb*' -exec readlink -f {} \;)
do
    if [ -b "${device}" ] && blkid "${device}" | grep -q LABEL
    then
        if ! mount | grep -q "^${device} on "
        then
            udisks --mount "${device}"
        fi
    fi
done

We identify all USB-attached block devices, loop over them checking for devices with a LABEL entry, verify they are not already mounted (in case this code is ever executed multiple times so as to avoid mount warnings being printed), and finally if everything checks out the device in question is mounted. Beautiful.

Where do I stick this? I could put it in a script under ~/bin/ and point to it under the Xfce Session and Startup -> Application Autostart section. However, I don’t always have Xfce running. Sometimes I log in directly from agetty on a virtual console eg. when I’m running the Nvidia driver installer, which fails when Xorg is running. If I have the Nvidia driver downloaded to my external hard drive, it would be convenient to have that device automatically mounted during login even without Xfce.

When you login through a display manager such as LightDM, /etc/X11/Xsession is executed. On Debian systems at least, this in turn calls all scripts placed under /etc/X11/Xsession.d/, which are often dropped there by various packages. eg. gnupg-agent, xbindkeys, etc. One of the script is called 40×11-common_xsessionrc (included as part of the standard x11-common package) and it sources ${HOME}/.xsessionrc. Since ~/.xsessionrc is sourced after Xorg has already started and logged us in (but have not quite yet ran x-session-manager – a symlink to xfce4-session managed via update-alternatives in my case), it gives us the opportunity to do all kinds of neat things. I already use it to detect external displays I have connected (via xrandr) and setup the monitor configurations according to a series of predefined profiles. eg. If there is one HDMI LCD with 1920×1080 as the max res, assume the LCD is to the right of my laptop and adjust my Xorg screen layout accordingly. I also use it to launch xmodmap, which is useful for disabling my Caps Lock key (although as the name implies it only works with X).

But ~/xsessionrc won’t be sourced if logging in from agetty. Instead, /etc/profile, followed by ~/.bash_profile, ~/.bash_login, or ~/.profile will be sourced (and of the three I only use ~/.profile). Likewise, ~/.profile won’t be sourced from a display manager (or at least it shouldn’t be – I have a vague recollection of GDM doing this, or having done it in the past). Anyway, let’s fix that. In ~/.xsessionrc we’ve now got:

# Send expanded command output to ~/.xsession-errors for debugging.
set -x

# source profile data
for file in "/etc/profile" "${HOME}/.profile"
do
    if [ -f "${file}" ]
    then
        . "${file}"
    fi
done
unset file

Since this file is sourced, it does not require executable permissions.

So now we can just stick our USB mount code in ~/.profile, right? Well yes, but I prefer something more elegant. Towards the end of my ~/.profile file, I have the following:

if [ -d "${HOME}/.profile.d" ]
then
    for script in ~/.profile.d/*.sh
    do
        if [ -f "${script}" ]
        then
            . "${script}"
        fi
    done
fi
unset script

I then have a directory called ~/.profile.d and I put various files under it that I want executed when I login, regardless if logging in from a display manager or agetty. Any time I have environment variables required for specific functionality or a specific application, I add them to a separate file here. For example, I have dh_make.sh which I use to export the DEBEMAIL environment variable, and wine.sh which I used to export debugging environment variables, driver tweaks (also applied through environment variables), and other things related to Wine. For the purposes of USB automount at login functionality, I created the file usb_mass_mount.sh and put the code there.

And that’s all there is to it (and in fact slightly more than is strictly necessary). No sudo privileges required, no tweaks to udev scripts, fstab, or anything specific to the current session-manager – or even anything dependent on Xorg even running. If there were a more elegant way to determine which devices are USB attached, without udev changes and without complex parsing of udisks --dump or the contents of /sys/block, it would be darn near perfect.

Anyway, that was a very long-winded explanation for something which turned out to be relatively simple. I think I probably got way too excited over this. Anyway, I hope somebody else finds this useful.

Exciting hardware in 2015

It’s been a long time since I have seen any new hardware truly excite me. The last time I can recall such an event was perhaps the release of largish affordable SSDs, or perhaps the release of high-resolution displays, which sadly are only now starting to become readily available to those of us outside of Apple’s ecosystem. Unfortunately most hardware improvements are so incremental that it’s hard to feel truly excited about something.

That all changed today, with the release of the MSI GS30 Shadow.

I’m currently the owner of an Asus G55VW Republic of Gamers i7 laptop. It’s a good mid-range “laptop”, however it’s actually a desktop replacement due to the sheer size and weight of it (and I did indeed use it to replace a mid-tower desktop – the first time I’ve ever used a laptop as my primary computer). I’ve maxed out the RAM to 32Gb, and added in a 1Tb m-SATA SSD and replaced the 1Tb mechanical SATA drive with another SSD. It also has a GTX660M which is powerful enough to run any game on the market, and thankfully doesn’t require me to deal with software to switch between the Intel integrated graphics and the Nvidia GPU – Intel graphics are not available. Unfortunately it is no longer powerful enough to run everything in the highest detail settings on recent titles as evidenced during a recent play-through of Far Cry 4. A graphics card upgrade may be in order in the near future, although that’s usually not possible on a laptop – a replacement is generally necessary. I usually use the laptop propped up on a stand with an external keyboard, HDMI-connected LCD, mouse and external Creative X-Fi 5.1 sound card.

In addition to this, I have an old Sony Vaio 11.3″ laptop with a measly AMD E-350 APU and 1366×768 resolution display. This is the laptop I use as an actual laptop – I take it everywhere with me since it’s quite light and is tough enough to take a few drops or knocks while in my bike pannier on my commute to work. Since it has some work files on it, it uses full disk encryption via LUKS. This is painfully slow on the E-350 (even with an SSD) as the APU lacks an Advanced Encryption Standard Instruction Set implementation and is a very underpowered processor in general. However it has proven tolerable for light workloads.

Interestingly the E-350 has a relatively high powered graphics processing capability. Many games such as Killing Floor actually run slower when game-play settings are set to the lowest graphics configuration due to the false assumption by the game developers that a GPU would be the bottleneck, as this option transfers more work from a GPU and onto a CPU (at the expense of graphical quality). Boosting the graphics quality up a bit shifts more work to the graphics component of the APU and results in a slight performance improvement! Ultimately, a game such as Killing Floor still runs too poorly to be playable as more enemies appear in later waves. The E-350 is best suited to simple games like the original Counter-Strike (yes, the one from 1999), and even then probably not at 1920×1080 if using an external monitor.

Since I don’t use the Sony Vaio for gaming (mostly just SSH and a basic instant messaging client), up until recently it’s worked out fine for me. It’s 100% compatible with free software drivers (although I think I may have replaced the wireless/bluetooth module at some point to avoid needing a blob), and has survived a lot of rough treatment over the years, largely due to a single fan being the only moving part. However now my workplace wishes to depend more and more on SaaS applications. I despise the direction things are heading in in this regard – where websites such as Slack, Trello and PassPack have become the norm – perhaps the subject of another post/rant. However this is the company data that is being dealt with – not my own. These proprietary SaaS applications are not being forced onto other people as is the case with traditional proprietary application vendors. It only hurts the companies which choose to use it (well, in addition to employees such as myself), so maybe I can live with it… however my computer certainly can’t. The E-350 just isn’t up to the challenge of these CPU-intensive websites.

Since I’m always on call to deal with any possible infrastructure emergencies which may arrive, I need to always have a computer with me. The E-350 was the perfect small cheap lightweight machine I could slip into my backpack or bike pannier and take with me anywhere. It is relatively fast at booting to an Xfce desktop and opening Terminator (the most time-consuming aspect is getting past the lengthy LUKS passphrase and LightDM login password). However the second I need to open Firefox to log into Slack, the browser loading times can be longer than the entire boot-up time! It’s ridiculous, especially given how PSI+ or Pidgin loads almost instantly on the same machine and provides the same functionality only with a different interface and open standards.

So now I’m in the market for a new computer. I can’t lug around my Asus G55VM as that’s too big to even fit in my bike pannier and would make my back sore if I had to carry it around in a backpack all the time. But if I’m going to get a new laptop, I’m going to want something fast, light, with a high resolution screen. It might be asking a bit much, but I was hoping to be able to use this as an opportunity to replace the G55VM as well if I could find something portable with a graphics card more powerful than an Nvidia GTX 660M (eg. perhaps a GTX 860M). This might be possible since I’d happily forego the Blu-Ray drive – I have external USB Blu-Ray drives which are faster and don’t have the firmware issues playing DVDs which the Matshita UJ160 drive (built into the Asus laptop) has.

You might be starting to get the impression I’m quite fussy with choosing a laptop, and you would be correct. In addition to the above, I also require a 1Gb ethernet port, upgradable RAM and SSD, EFI which allows manual upload of custom signing keys for Secure Boot (which I imagine means restricting my options to the three big-name Taiwanese computer manufacturers, since those are the companies that tend to market more towards people who know what they are doing and expose all possible options), a HDMI port for an external monitor (as I’m yet to see an LCD in person that uses DisplayPort), and a dedicated 3.5mm mic-in port for use with my Sennheiser PC 360 G4ME headset when I don’t have my external sound card with me.

Ideally I would also like I/O MMU virtualization (AMD-Vi or Intel VT-d) support, so I can use the laptop as a new home server when it is time to retire it from laptop use (I use Xen and would make use of PCIe pass-through to guest for the NIC in a dedicated firewall VM), a backlit keyboard, no USB 2.0 ports (everything should be USB 3.0 these days), support for a second SSD, and a matte screen. I also don’t want an Asus Transformer laptop, since I’m not interested in tablet or touch-screen functionality (which are usually glossy anyway), and I’m not confident the hinges (with the detachable keyboard) would be able to withstand much punishment.

Now, I’ve been looking for something that fits all of the above as best as I can, but everything I have found requires compromising somewhere. Maybe something comes close, but doesn’t have an Ethernet port, or is too heavy, or doesn’t have VT-d or AES CPU support. Maybe it only has a GT 840M GPU, which wouldn’t really be an upgrade over a GTX 660M. It’s almost impossible to find something in a small form factor with support for two SSD storage devices. Everything I have seen has failed to impress, so I’ve been procrastinating on making a decision about what to do.

Well, today I was browsing the PC Case Gear website, and noticed something strange in the gaming laptop section which I had not seen before. That laptop is the MSI GS30 Shadow, and it amazingly ticks all the boxes with ease due to an impressive feature. A feature so simple, I can’t believe it hasn’t been done before. In addition to being a kick-ass Ultrabook, albeit one without a dedicated GPU, it supports and includes an external enclosure which can be used to connect a real PCIe 16x graphics card to it of your choice! This external enclosure doubles as speakers (which I probably won’t use since I already have a nice 5.1 surround sound setup), a 4-port USB 3.0 hub (so I can leave my keyboard, mouse, external sound card, external optical drives, etc. permanently connected) and includes a 3.5″ SATA expansion port for an SSD to store all those games on that require a powerful GPU. The enclosure is actually a docking station which the laptop sits on top of, so I could use this to replace my existing laptop stand as well.

I’m absolutely stoked. This is almost exactly what I’ve been looking for. I’ve wanted an Ultrabook-like machine which has upgradable RAM and storage (this provides two SSDs connected via two M.2 SATA connectors), and yet is lightweight and portable and has a high-end quad core processor with IO/MMU and AES CPU extensions. But the main feature is easily having the ability to finally upgrade the graphics card in a laptop. I don’t need portable GPU power since I mainly use my laptop away from home for work purposes, but I do want it at home for personal use. And as if all this wasn’t enough, the external GPU enclosure includes an additional 1Gb ethernet NIC – perfect for re-purposing this machine as my home server in the distant future. I also wonder if I might one day find alternate uses for that PCIe slot, such as a SAS controller. It’s exciting to think about the possibilities.

Although this laptop comes close, it isn’t perfect. It seems the laptop will only support up to 16Gb of RAM. I’m used to 32Gb (mostly for when I’m experimenting with various virtual machines or using it as cache for slower external mechanical/optical drives), but I’m confident 16Gb will still be enough to not make the decrease too noticeable. I would have liked to see a QHD display resolution option, although omitting it is probably reasonable given it would only be used with the integrated Iris Pro 5200 graphics. I also have the usual complaints about Windows being forcefully bundled (and a version of Windows that I especially hate), but given how fussy I am with hardware specifications (and my dabbles with Wine which sometimes uses licensed Microsoft components), I’m not as upset about it here as other people would be. It would also be nice if the dock supported more than just one 3.5″ SSD and PCIe slot. I also wonder if other future laptops will be released by MSI that will be compatible with this dock, although that seems doubtful given the dock size doesn’t look big enough to support larger laptops.

Upon reading reviews of the GS30 Shadow, I saw references to another recently-released device with similar functionality compatible with some Alienware series of laptops – Alienware’s Graphics Amplifier (which I’ll hereafter refer to as the AGA). This is something purchased separately to the Alienware laptops it is compatible with, and has the advantage of being able to pass the external GPU graphics onto the laptop display – a feature I can’t imagine myself using – but my gut feeling is that this might complicate GNU/Linux compatibility. The Alienware solution also has some significant drawbacks:

  • The AGA connects to the laptop through a cable instead of via a dock. Although the AGA includes a PCIe 16x slot, the cable limits the bus bandwidth to PCIe 4x speeds, which will surely hinder the ability to upgrade down the road as performance will be compromised on faster graphics cards. I also feel Dell is misleading people about this as the limitation is not mentioned anywhere I could find on the website, although I can’t say I’m surprised.
  • It doesn’t include a SATA controller or mounting brackets. This is a great feature of the MSI solution in my opinion, and something I’d like to make use of.
  • It doesn’t look like something I could sit my laptop on reliably. That means I’ll have to find more desk space, and I’m not sure I would be able to comfortably find the room. I also can’t imagine cable length would be great.
  • Alienware is nowadays owned by Dell. Dell and I have a bit of history, and I’d like to avoid that company wherever possible.
  • Perhaps most importantly, there is no comparable Dell laptop compatible with the AGA – no 4th Generation i7 CPU with VT-d support in a 13″ machine, and the 13″ laptops on offer are almost twice as heavy as the MSI.

So there we go, the MSI GS30 Shadow is a winner. It isn’t actually released in Australia for another two days, but I’m convinced that the GS30 will be my next laptop sometime soon. I’ve never owned a MSI laptop before, but now I’m certainly looking forward to it.

Gamers no longer need dual-boot

Tonight I completed Outlast, a first person survival horror (read my review here) under Wine on GNU/Linux, and have updated my Finished Games list to reflect this. Looking through that list, one thing has became clear; no matter if you’re a fan of indie games or AAA blockbuster titles, GNU/Linux now has it all on offer!

In 2011, I completed 20 games under Windows 7. That same year, I completed just 11 games under GNU/Linux, just one of which was played under Wine.

For comparison, this year (so far) I have completed 0 games under Windows (any version), and 26 games under GNU/Linux – 13 of which were played under Wine! One of those games played under Wine (Cargo, a free software release) also has a GNU/Linux version but is not quite stable yet (or wasn’t at the time I played it). Another game I completed under Wine – Doom 3 BFG – has also been released mostly as free software and has native ports to GNU/Linux (such as RBDOOM-3-BFG) but I ended up playing the official release via Wine due to Steam achievement support. It should be possible to play both of these titles natively under GNU/Linux also, to bring the native game count up to 15.

I purchased a new laptop (good enough for some gaming) earlier this year, and did away with Windows completely at that time. At first I was concerned that I wouldn’t be able to play many titles that interest me, but I am happy to report that I simply haven’t missed Windows as I thought I would. There is an abundance of native GNU/Linux games now – and it’s the first year that we’ve been able to claim to have AAA blockbuster titles such as Metro: Last Light! Playing Metro natively is simply amazing.

For blockbuster titles that still don’t have GNU/Linux ports, Wine has been making amazing progress in terms of performance and compatibility (as the figures from my Finished Games list clearly demonstrate). Many big releases (eg. Far Cry 3: Blood Dragon, Dead Island Riptide and StarCraft II: Heart of the Swarm) are handled with ease upon release (Blood Dragon initially requiring a crack, but that no longer seems to be the case). The main thing still missing is DirectX 11 support (which means Bioshock Infinite doesn’t work), but performance is improving and with command stream patches to be merged mainline in the near future this will only get better.

My faith in Wine compatibility (with any title that advertises Windows XP and Steam support) is strong enough that I felt comfortable pre-ordering Dead Island Riptide, and as expected the game installed fine and ran just fine.

So if you’re a GNU/Linux user and a gamer in 2013 and you’re still dual-booting with Windows just for games, I must ask – why?