Category Archives: Software

Software

ASRock X99 Extreme4 running GNU/Linux

I picked up an old ASRock X99 Extreme4 motherboard from my workplace during an office move a while back which was no longer required by the company. Naturally I put Debian GNU/Linux on it!

It does not use ECC RAM, and I would always see these annoying messages in the kernel logs:

EDAC sbridge: Seeking for: PCI ID XXXX:XXXX

This would be repeated 33 times for different PCI IDs, all of which were repeated 12 times each (for each CPU thread it seems), resulting in 396 such kernel messages for every boot!

Further, each CPU thread would print the following error in red:

EDAC sbridge: CPU SrcID #0, Ha #0, Channel #0 has DIMMs, but ECC is disabled
EDAC sbridge: Couldn’t find mci handler
EDAC sbridge: Failed to register device with error -19.

Clearly the system is attempting to work with ECC which is not configured on this system. Having ECC usage fail is expected, but the logs are very annoying. They get in the way of any messages which might actually be important.

Fortunately, after some trial and error, this was the solution which made all of these pointless messages go away:

echo "blacklist sb_edac" > /etc/modprobe.d/edac-blacklist.conf

If you find yourself in a similar situation with a different motherboard, you can blacklist all edac-related kernel modules used by the currently running kernel by running the following as root (all as one line):

for i in $(find "/lib/modules/$(uname -r)" -type f -iname '*edac*' -exec basename {} \; | cut -d '.' -f 1) ; do echo blacklist ${i} ; done > /etc/modprobe.d/edac-blacklist.conf

Once you have created an edac-blacklist.conf file with one of the above commands, you can have it take effect by regenerating your initramfs file like so (again, as root):

update-initramfs -k all -u

Hopefully someone else finds this information useful.

Customising XDM for the modern desktop

As per my previous blog post, I’m now using XDM as a login manager. By default, it looks like something straight out of the ’80s. Having said that, it’s not too difficult to give it additional functionality ad make it look nice. With the help of this tutorial, I was able to put together the following:

My custom XDM theme.

My custom XDM theme.

As per the linked tutorial, I have used an embedded xmessage window to create the Shutdown and Reboot buttons.

In order to recreate this setup, you will need to do the following:

  1. Drop the meditate-black-bottom_right.png wallpaper into /etc/X11/xdm/.

    This file can actually be references from anywhere, but it makes sense to me at least to keep it all together.

    The wallpaper was taken from the FSF’s wallpaper section (specifically here) and is distributed under either the GPL3+ or GFDL1.1+ (with no invariant or front/back-cover texts). I just slapped it on a black 1920×1080 background and exported it as a PNG. I then load this as the XDM wallpaper via xloadimage. Note if you are doing your own modifications (perhaps to change the colour or resolution) that xloadimage will only render transparent pixels as white, and there is no built-in option to change this.

  2. Edit /etc/X11/xdm/xdm-config and replace the following lines:

    DisplayManager*resources: /etc/X11/xdm/Xresources becomes DisplayManager*resources: /etc/X11/xdm/Xresources_custom

    DisplayManager*setup: /etc/X11/xdm/Xsetup becomes DisplayManager*setup: /etc/X11/xdm/Xsetup_custom

    and

    DisplayManager*startup: /etc/X11/xdm/Xstartup becomes DisplayManager*startup: /etc/X11/xdm/Xstartup_custom

    We need to create the Xresources_custom, Xsetup_custom and Xstartup_custom files in the steps that follow.

  3. Create /etc/X11/xdm/Xresources_custom.
    This is basically the same as Xresources, only with some additional lines appended to the end. It can be created with the following two commands:

    # cp -f /etc/X11/xdm/Xresources /etc/X11/xdm/Xresources_custom
    # echo "
    
    Xmessage*geometry:              170x27+20+20
    Xmessage*background:            black
    Xmessage*foreground:            red
    Xmessage*Font:                  -xos4-terminus-*-r-normal-*-*-180-*-*-*-*-*-*
    Xmessage*borderWidth:           0
    
    Xmessage*message.scrollVertical:        Never
    Xmessage*message.scrollHorizontal:      Never
    Xmessage*message*background:            black
    
    Xmessage*Text*background:       white
    Xmessage*Text*foreground:       red
    Xmessage*Text.borderColor:      black
    Xmessage*Text.borderWidth:      0
    Xmessage*Text*font:             -xos4-terminus-*-r-normal-*-*-180-*-*-*-*-*-*" >> /etc/X11/xdm/Xresources_custom
    

    This assumes you have the Terminus font installed. If you don’t have it, you can either install it through your package manager or alternatively fire up xfontsel and select something else that works for you.

  4. Create /etc/X11/xdm/Xsetup_custom with the following contents:
    #!/bin/sh
    #
    # This script is run as root before showing login widget.
    
    #--- set a fullscreen image in background
    xloadimage -onroot -quiet -fullscreen /etc/X11/xdm/meditate-black-bottom_right.png
    
    #--- set Shutdown/Reboot buttons
    (
    xmessage -buttons Shutdown:20,Reboot:21 "" ;
    case $? in
        20)
    	TERM=linux openvt -c 1 -f /usr/bin/clear
            exec openvt -c 1 -f -s -- /sbin/shutdown -hP now
            ;;
        21)
    	TERM=linux openvt -c 1 -f /usr/bin/clear
            exec openvt -c 1 -f -s /sbin/reboot
            ;;
        *)
            echo "Xmessage closed on $(date)"
            ;;
    esac
    ) &
    

    Fix the path to the image in the xloadimage command if you placed the file (or a different background image) elsewhere.

    Notice we use the openvt command to switch to the first virtual console for the purposes of executing the shutdown or reboot commands. This is because (on Debian Wheezy at least), terminating Xorg with XDM running will switch you back to the first virtual console, so you’ll need the output printed there if you wish to see anything during the shutdown sequence.

  5. Create /etc/X11/xdm/Xstartup_custom with the following contents:
    #!/bin/sh
    #
    # This script is run as root after the user logs in.  If this script exits with
    # a return code other than 0, the user's session will not be started.
    
    # terminate xmessage
    killall xmessage
    
    # set the X background to plain black
    xsetroot -solid black
    
    if [ -x /etc/X11/xdm/Xstartup ]; then
      /etc/X11/xdm/Xstartup
    fi
    
    # vim:set ai et sts=2 sw=2 tw=0:
    

    As can be seen from this last few lines, we still re-use the contents of the original Xstartup script, so keep that around if using these scripts as is.

  6. Finally, make sure the new files have the correct permissions. Xresources_custom only needs to provide read access, but Xsetup_custom and Xstartup_custom should be executable.

    # chmod 0644 /etc/X11/xdm/Xresources_custom
    # chmod 0755 /etc/X11/xdm/Xsetup_custom /etc/X11/xdm/Xstartup_custom
    

And there you have it, and beautiful-looking XDM setup, that runs extremely fast but still includes the shutdown and reboot buttons.

How to replace LightDM with XDM in Wheezy

My machine is an Asus G55VW laptop, and it seems to have a very annoying UEFI or Nvidia driver bug. Even under Windows (which the laptop came with), everybody with this model is experiencing odd behaviour – the laptop will fail to detect the display properly in certain situations and attempt to output the screen to an external monitor – even if nothing is connected! Under Windows 8.1, this means the login screen isn’t displayed, and one must press Meta+P, hit the down arrow once or twice, and press enter (and do this until the internal laptop screen is activated). It’s absolutely horrible, and has only showed itself in the Windows world upon upgrading to Windows 8.1.

On Debian with LightDM however, I have experienced what I believe is this same issue (based on Xorg log file analysis) ever since I brought home the machine. Unlike Windows, I can login okay. However logging out of XFCE to the LightDM display manager causes the internal laptop screen to not be detected correctly during the switch. The result is a blank screen, and LightDM has no way (AFAICT) to switch display output via a shortcut when it’s already running. Further, it even prevents switching to a virtual console as no image will reappear if I hit Ctrl+Alt+F1 for example (which shouldn’t ever happen without explicitly disabling it in the Xorg config at least, which I certainly haven’t). The only option in such a situation is to switch to a virtual console and blindly hit Ctrl+Alt+Del and wait for the UEFI screen to appear.

Until recently (when Windows was upgraded to 8.1 and showed similar symptoms), I had always attributed this behaviour to a bug in Wheezy (since I purchased the laptop around the time Wheezy was being marked as stable so it could not have been tested on this model) and assumed it would be solved in time with Jessie, but now I’m not so sure. Rebooting the machine is very quick (the longest part easily being the lengthy passphrase required for cryptsetup) – quick enough that I’ve never bothered getting to the bottom of it, particularly since I can generally avoid hitting the problem in the first place since I’m so familiar now with what triggers it. However now I’m seeing such odd and annoying behaviour from both operating systems, it’s time to do something about it.

The only reliable way to avoid this is to activate CSM in the UEFI (to mimic BIOS functionality), but that has a number of drawbacks. The boot output resolution is restricted to VESA modes, which look horrible on a 1920×1080 display (especially when UEFI detects the resolution perfectly and looks beautiful). It also means I can’t use the rEFInd boot manager, which I now much prefer over GRUB on desktops and laptops. CSM also prevents enabling “Fast Boot” in the BIOS, which introduces a small but unnecessary delay. Indeed, enabling CSM feels like a significant step backwards, so I will try to avoid that wherever possible.

I’ve tried GDM3 temporarily, and that had the same issue at first. However I found that pressing fn+F8 (the LCD/monitor switching/toggle button) surprisingly worked and brought the picture back so I could see the login prompt. It even seemed to remember this setting somehow as I was never able to reproduce the issue with GDM3 after that. I thought that was the end of this dilemma and I could get back to doing something else. Unfortunately GDM3 had other issues.

Firstly, upon wearing headphones during login I was able to hear my laptop internal microphone was active via a loud hissing noise, and confirmed this by tapping the mic. I could find no way to turn this off, and could not think of any reason why GDM3 would be doing that. Secondly, I didn’t like the user accounts listed for selection. I wanted to type my username, as there is no reason to make the login name unnecessarily obvious. There was an option in the GDM theme config to allow this, but it wasn’t reliable. If I started entering my username and hit Escape or Ctrl+C (with the expectation that I could clear the box in the event of a typo), the login window would disappear completely and I’d have to reboot. Yuck!

But the worst issue of all, GDM3 was just too slow to keep up with my typing speed! I would type in my username, hit enter or tab, and then start typing in my password. Only the password would be missing the first few characters since the password box had not properly appeared yet. Even after all of that, there was a noticeable delay in launching my XFCE desktop. I can only imagine what it was doing with those CPU cycles.

So looking around at other display managers packaged in Wheezy, I found two suitable options – SLiM, and XDM. I didn’t know much about SLiM. I knew XDM was about as bare-bones as one could get, I knew it was fast, and I knew it required manually typing the username… it seemed to be the way to go, so I set out to make that happen.

$ sudo apt-get install xdm

I selected XDM to be my default login manager, rebooted, and there it was in all its glory. There were some things missing however – no X session manager list to choose from (which is perfectly fine), but also no shutdown and reboot options. I could live without those, although I still expected it would be a minor inconvenience. I was happy with the speed of the prompts – it felt slightly quicker than LightDM (that is, probably no perceivable delay). However XFCE spent about 20 seconds to appear. When it had finally loaded, some issues were encountered. For one thing, USB mounting wasn’t working. Manually clicking the mount button in Nautilus caused a “Not authorized” error to be displayed, with no hint as to why. The USB drives didn’t automatically mount via my usb_mass_mount.sh script either. I eventually noticed that even Network Manager wasn’t working!

Was all of this because I was using XDM? Some quick web searches for “Debian xfce xdm” indicated as such. Was it worth trying to fix it? I logged out of XFCE (observing as I went that even the reboot, shutdown, suspend and hibernate options were either missing or greyed out) and XDM continued to output to the correct monitor. Whatever this issue is with my model of laptop, XDM is not affected. With this and it’s impressive text entry speed, I decided these XDM issues were worth looking into.

What followed was a lot of careful analysis of the scripts under /etc/X11/Xsession.d/, and much research into what was causing this. Essentially, this can all be fixed with two or three minor changes – but they are amazingly difficult to figure out if you’ve never looked into the related technologies before.

PAM
In /etc/pam.d/common-session at the bottom of the file, there is the line “session optional pam_ck_connector.so nox11“. From the pam_ck_connector(8) man page, the nox11 argument tells the PAM module to not create a session if PAM specifies an X11 display instead of a /dev/tty terminal. I guess the assumption is that the display manager will handle this automatically, but XDM is too primitive to have ConsoleKit support. Hence remove that nox11 bit from the line. I actually like to copy the line, modify the copied line and then comment out the original, so such changes are slightly more obvious and easier to undo if I ever need to revert. Alternatively, take a backup. :)

Xsession
Our session needs to be started with /usr/bin/ck-launch-session. This is supposed to happen from /etc/X11/Xsession.d/90consolekit when it’s required, but it’s broken and needs to be fixed. There are a few ways to do this. Ideally I would have found a way to just bypass this script entirely (replacing the functionality with something in my home directory) but any fix would involve some kind of modification under /etc/X11 somewhere that I figured it best to just fix this at the root of the problem. Here is my patch:

--- 90consolekit.orig	2015-02-04 17:42:07.549621276 +0800
+++ 90consolekit	2015-02-04 17:41:25.021379155 +0800
@@ -24,9 +24,17 @@ is_on_console() {
 	fi
 }
 
+is_xdm() {
+	if [ "$(pgrep -cfx /usr/bin/xdm)" -ge 1 ] ; then
+		return 0
+	else
+		return 1
+	fi
+}
+
 # gdm already creates a CK session for us, so do not run the expensive D-Bus
 # calls if we have $GDMSESSION
 if [ -z "$GDMSESSION" ] && [ -x "$CK_LAUNCH_SESSION" ] && \
- ( [ -z "$XDG_SESSION_COOKIE" ] || is_on_console ) ; then
+ ( [ -z "$XDG_SESSION_COOKIE" ] || is_on_console || is_xdm ) ; then
     STARTUP="$CK_LAUNCH_SESSION $STARTUP"
 fi

Seems to do the job. Doesn’t break compatibility with startx (presumably – my laptop display doesn’t seem to work with that either so can’t verify) or other display managers since it specifically tests to see if XDM is running.

usb_mass_mount.sh
My lovely USB automatic mount script has been intermittently failing since switching to XDM, and it wasn’t immediately obvious why since it only failed during login and could not be reproduced afterwards. I quickly discovered that the udisks command was also actually returning a Not authorized error (the same as was observed from Nautilus prior to the above fixes) – something I did not encounter under LightDM. AFAICT, the login is so fast now that it tries to run before ConsoleKit has properly initialized! I simply added in a 0.1 second delay (because as programmers know this always fixes everything), and now it’s working perfectly again.

# Mount all USB block devices that have a filesystem label.

for device in $(find /dev/disk/by-path -name '*usb*' -exec readlink -f {} \;)
do
    if [ -b "${device}" ] && blkid "${device}" | grep -q LABEL
    then
        if ! mount | grep -q "^${device} on "
        then
            ( 
                sleep 0.1
                udisks --mount "${device}"
            ) &
        fi
    fi
done

And there we have it, a lightning fast XDM login screen, and now I can actually log out and in again as well!

Automount USB devices on login

There’s an issue I’ve been wanting to sort out for over a year, but it’s one of those niggling annoyances that’s just hard enough to find an elegant solution for that encourages me to keep putting it off. Well no more! I’ve finally got this problem licked.

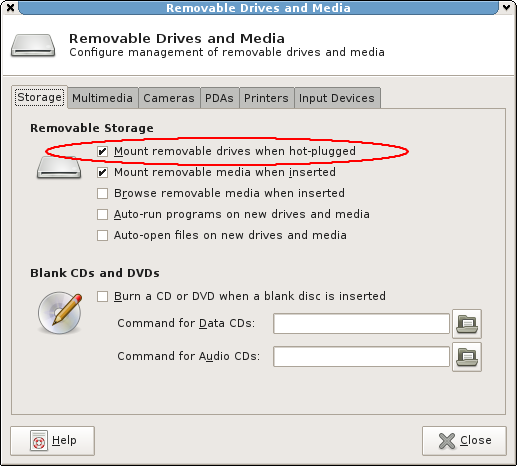
So to clarify my situation, I have an external USB HDD for my laptop with a bunch of large games on it and the like, which won’t fit on my laptop internal SSDs. I run Xfce, and I have the option under Removable Drives and Media labeled Mount removable drives when hot-plugged ticked, and this works as the developers intended.

Xfce 4.8 option to mount removable drives when hot-plugged.

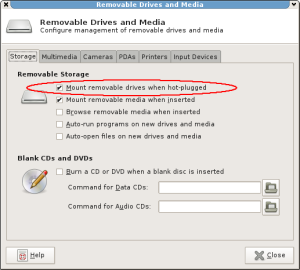
Mount removable drives when hot-plugged.

The problem is that I don’t lug this largish laptop around too much with me, so the USB HDD remains connected most of the time. When I power up I can see the device under Thunar and Nautilus, however it is not mounted. I need to manually click on the drive for that first. The reason being is that the device was not hot-plugged after Xfce was loaded – it was already connected when I logged in. Having to open a file manager and click the drive before I can use it after each reboot is, well… not ideal.

I’m aware one option could probably be to just add an entry to my /etc/fstab file to automount this if the device exists on boot, but I don’t like that for two reasons. Firstly, I might want to use a different HDD (or multiple HDDs) in the future. I don’t want to have to edit my /etc/fstab file for every HDD, SD card, USB stick or whatever. Basically, if a device is already inserted, and I’ve given it a filesystem label (so the filesystem is able to be mounted with a fixed mountpoint name under /media/ as per usual hot-plug USB mounting), I want it automatically mounted by the time I’m logged in. In the event a device does not have a label, I don’t want it automatically mounted since it may not have an obvious name or even a fixed mountpoint automatically created for any kind of automount to be meaningful. Since I don’t know what devices I’ll connect in the future, simply adding /etc/fstab entries won’t suffice.

Secondly, I want filesystems that do not have permissions (or permission support under GNU/Linux) to be mounted as the user currently logged in. If my spouse (for example) logs into my laptop with her own account and wants to plug in an NTFS or FAT32 formatted device, she should be able to do so without permission trouble. If /etc/fstab had mount permissions set to allow only my user account access, it would present problems. Conversely if she did have permission, it would mean either /etc/fstab also allowed my login access to the device as well (via group permissions) – probably not ideal for privacy, or permissions were so relaxed that any user on the system could access the device (eg. a 0000 umask) – a significant security risk!

After a bit of searching around the web, I decided the udisks command in the udisks Debian package was the way to go. As this package is a dependency for the xfce4-power-manager package, as an Xfce user I already found this to be installed. I also looked into pmount (which did not create entries under /media/ automatically using the device filesystem label), and usbmount which is no longer maintained, and (according to the Debian wiki page) should not be used if you want a desktop icon, and also apparently has the same issue pmount has (ignoring filesystem labels for use as mountpoint names). I wanted the behaviour of manually clicking the drive icon in the file manager mimicked as closely as possible, and udisks seems to do just that.

Unfortunately, udisks does not have some kind of “mount all” option. It does tell you which devices are connected via USB (via the --dump argument) but that did not look so easy to parse (and I wouldn’t be surprised if this output formatting changed when upgrading or replacing distributions that might include a new udisks version). Instead, I noticed looking under /dev/disk/by-path/ that USB devices had -usb- as part of the symlink name – be it the raw block device or a partition. This looked good enough to me, so I used that.

$ find /dev/disk/by-path -name '*usb*' -exec readlink -f {} \;
/dev/sdc1
/dev/sdc
$ 

I typically partition all my devices, including USB sticks. Still, I wanted a solution that would detect the correct device to mount regardless. I thought about using file -s <devices> but that requires either raw block device access (which seems too risky) or having the ability to automatically run the file command via sudo without a password. Running file on untrusted code is in some ways even more risky, given this can trigger code execution, as I recall. I would also prefer to have a self-contained solution – and by that I mean no changes outside of my home directory, and not something that changes my setup globally. I should be able to understand everything going on just by having common knowledge of how a distribution is put together and looking in the one spot.

In the end, I determined blkid would be helpful. It does not require root privileges, should exist on pretty much any system (as it’s included in the util-linux package), and can easily identify block devices with a filesystem label – which is all I’m actually interested in anyway. So here’s the solution we end up with:

# Mount all USB block devices that have a filesystem label.

for device in $(find /dev/disk/by-path -name '*usb*' -exec readlink -f {} \;)
do
    if [ -b "${device}" ] && blkid "${device}" | grep -q LABEL
    then
        if ! mount | grep -q "^${device} on "
        then
            udisks --mount "${device}"
        fi
    fi
done

We identify all USB-attached block devices, loop over them checking for devices with a LABEL entry, verify they are not already mounted (in case this code is ever executed multiple times so as to avoid mount warnings being printed), and finally if everything checks out the device in question is mounted. Beautiful.

Where do I stick this? I could put it in a script under ~/bin/ and point to it under the Xfce Session and Startup -> Application Autostart section. However, I don’t always have Xfce running. Sometimes I log in directly from agetty on a virtual console eg. when I’m running the Nvidia driver installer, which fails when Xorg is running. If I have the Nvidia driver downloaded to my external hard drive, it would be convenient to have that device automatically mounted during login even without Xfce.

When you login through a display manager such as LightDM, /etc/X11/Xsession is executed. On Debian systems at least, this in turn calls all scripts placed under /etc/X11/Xsession.d/, which are often dropped there by various packages. eg. gnupg-agent, xbindkeys, etc. One of the script is called 40×11-common_xsessionrc (included as part of the standard x11-common package) and it sources ${HOME}/.xsessionrc. Since ~/.xsessionrc is sourced after Xorg has already started and logged us in (but have not quite yet ran x-session-manager – a symlink to xfce4-session managed via update-alternatives in my case), it gives us the opportunity to do all kinds of neat things. I already use it to detect external displays I have connected (via xrandr) and setup the monitor configurations according to a series of predefined profiles. eg. If there is one HDMI LCD with 1920×1080 as the max res, assume the LCD is to the right of my laptop and adjust my Xorg screen layout accordingly. I also use it to launch xmodmap, which is useful for disabling my Caps Lock key (although as the name implies it only works with X).

But ~/xsessionrc won’t be sourced if logging in from agetty. Instead, /etc/profile, followed by ~/.bash_profile, ~/.bash_login, or ~/.profile will be sourced (and of the three I only use ~/.profile). Likewise, ~/.profile won’t be sourced from a display manager (or at least it shouldn’t be – I have a vague recollection of GDM doing this, or having done it in the past). Anyway, let’s fix that. In ~/.xsessionrc we’ve now got:

# Send expanded command output to ~/.xsession-errors for debugging.
set -x

# source profile data
for file in "/etc/profile" "${HOME}/.profile"
do
    if [ -f "${file}" ]
    then
        . "${file}"
    fi
done
unset file

Since this file is sourced, it does not require executable permissions.

So now we can just stick our USB mount code in ~/.profile, right? Well yes, but I prefer something more elegant. Towards the end of my ~/.profile file, I have the following:

if [ -d "${HOME}/.profile.d" ]
then
    for script in ~/.profile.d/*.sh
    do
        if [ -f "${script}" ]
        then
            . "${script}"
        fi
    done
fi
unset script

I then have a directory called ~/.profile.d and I put various files under it that I want executed when I login, regardless if logging in from a display manager or agetty. Any time I have environment variables required for specific functionality or a specific application, I add them to a separate file here. For example, I have dh_make.sh which I use to export the DEBEMAIL environment variable, and wine.sh which I used to export debugging environment variables, driver tweaks (also applied through environment variables), and other things related to Wine. For the purposes of USB automount at login functionality, I created the file usb_mass_mount.sh and put the code there.

And that’s all there is to it (and in fact slightly more than is strictly necessary). No sudo privileges required, no tweaks to udev scripts, fstab, or anything specific to the current session-manager – or even anything dependent on Xorg even running. If there were a more elegant way to determine which devices are USB attached, without udev changes and without complex parsing of udisks --dump or the contents of /sys/block, it would be darn near perfect.

Anyway, that was a very long-winded explanation for something which turned out to be relatively simple. I think I probably got way too excited over this. Anyway, I hope somebody else finds this useful.

Well that’s embarrassing…

I thought I was being smart. Instead of pulling in mail directly to my laptop’s Maildir++ directory via offlineimap, I thought I’d use fetchmail to deliver it to my laptop postfix install instead. That way, I could use IDLE reliably, and also configure my laptop’s MTA to use maildrop to test out new mail filters before fully adopting them on my mail server. All good stuff. I installed fetchmailconf and ran the wizard. It wanted to test an initial import of everything. Fair enough, let’s go…

What I completely forgot was that I had added a .forward file to my laptop home directory some time ago, which forwarded all local mail to the account I was importing from!

As you might imagine, this caused a mail loop. Very quickly, my mail server decided “nope, I’ve seen this before and I’m stuck in a loop – bounce the message”. I caught the problem pretty quick – I realised mail was importing slowly, and noticed my modem unexpectedly busy. I quickly tailed the mail logs, saw what was happening, cancelled fetchmail, stopped Postfix and nuked the mail queue… but in that short time, 1663 bounce e-mails had been sent out.

Luckily, things appear to have not been too bad. Most e-mail was sent from forwarding accounts, since I only recently switched over to hosting e-mail myself. The majority of the e-mail was also backup notifications and other server reports that would not have relayed to external servers. Much of my e-mail was also sent to mail lists, which normally will discard bounced e-mails. I likely e-mail my spouse the most, and she received under 30 e-mail bounces. I also received bounce messages from Google for the bounce messages – Google temporarily blocked my address, which I’m surprisingly glad about. It should also be pretty clear to anyone who received the messages that it was a configuration issue based on the fact that the e-mails all came through within about 2 minutes of each other, most of the messages were old, and that most or all of the messages had already been replied to at some point.

There was much to be learned from this experience. I usually consider myself someone who pays attention to detail, but that didn’t stop me from tripping up – on a one-liner too! It would have been nice if fetchmailconf had an option to test just a few messages first, as opposed to automatically running across everything in your account. In any case, if you happened to be on the receiving end of my dumb mistake, I apologise for the hassle.

Why I will not back FSF’s guidelines for free software distributions

The FSF publishes a document describing guidelines for free software distributions on gnu.org, as well as a list of distributions known to comply with these guidelines. In light of popular distributions that are increasingly including and recommending non-free software, these guidelines and distributions are a breath of fresh air to many – but they too are not without their problems.

From the guidelines, “any nonfree firmware needs to be removed from a free system”. The purpose of such firmware is to allow the target hardware device to function, so essentially distributions like Trisquel GNU/Linux feel it is fine to disable parts of a computer if it cannot be used in a completely free way. I have no complaint about this per se, but the way this is implemented in practice makes these distribution maintainers come off as hypocrites. These distributions are being reduced to not much more than a marketing ploy to mislead users. To understand why, I need to explain a bit more about what is meant exactly by the FSF when they refer to “firmware”, and why in many cases it’s a non-issue.

When the FSF talks about firmware, they are using it in a way that is inclusive of the term “microcode“. This is important, because proprietary microcode is everywhere and difficult to avoid. Even so-called “freedom-compatible” hardware frequently includes it.

If you are running an x86 processor released in the last 10 years or so, your CPU likely supports microcode runtime updates from within the operating system. If you run a Debian Wheezy GNU/Linux distribution, an Intel CPU and have the intel-microcode non-free package installed, this will automatically load the latest proprietary Intel microcode into your CPU at boot (if the packaged version is newer than what is already running).

So what happens if you don’t have this package installed? The answer is that your computer BIOS already includes CPU microcode that it injects into your CPU every time you turn your PC on. This is done before your operating system (or even its bootloader) has started to load. Were you not to load microcode updates in from your operating system, you would need to rely on flashing BIOS updates to deliver your CPU microcode updates. Either way, like it or not, you’re going to run Intel or AMD microcode at boot. It’s just a question of having the latest version with microcode fixes, or running an older version.

Here is the beginnings of why the argument for fully free software distributions (for the x86 architecture at least) falls flat on it’s face. These distributions might be 100% free software, and give you the illusion of having a computer that is fully free, but in practice removing this microcode has achieved very little – if anything at all.

CPUs aren’t the only devices you’ll find in modern PCs that require microcode. Enter the subject of graphics cards. This is where my main gripe with these distributions comes into being. Modern AMD graphics cards, like the CPUs discussed above, require microcode to function properly. Unlike CPUs however, AMD graphics cards need drivers to load this microcode into the GPU at boot – the BIOS will not do this.

AMD has helped the free software community create some great free software drivers. They have released all the specifications, and assisted in the development of code. Nvidia, by comparison, seldom plays ball with free software developers and (for x86-based graphics card drivers at least) has basically been no help at all. If you’re in the market for a high-end graphics card from one of these vendors, AMD would seem the logical choice – support the guys who support free software the most, right? No! Not according to the FSF!

Generators for Nvidia microcode have been created, but not for Radeon microcode. This result is likely just out of necessity – Nouveau (the free software project that has reverse engineered Nvidia graphics card drivers) likely were not able to redistribute the existing proprietary microcode due to licensing. However since AMD has allowed Radeon microcode to be distributed “as is” (basically do whatever you want with it [Edit: Sadly I was mistaken – you can basically redistribute as you like but “No reverse engineering, decompilation, or disassembly of this Software is permitted.”], but did not release the means to recreate the (21K or less in size) microcode file, there was little incentive for developers to replace this – they would rather work on actually getting the drivers working properly than dedicating time to what appears to amount to (in this case at least) a purely philosophical exercise.

Now I admit, I don’t like that I need to run my AMD graphics hardware with proprietary microcode (even if they do have excellent free software drivers). Distribution maintainers have two options:

1. Allow the user to install microcode (possibly that the user provides so as to not need to redistribute it as part of the project) to have a working and otherwise completely free software operating system installed

or

2. Don’t make it easy to have the user get his/her hardware working, make them install a different distribution that may respect software freedom far less

Although option one would seem more logical at a glance, we have already established distribution maintainers wishing to comply with the FSF guidelines for free software distributions will need to elect to go with option two.

Now that all the discussion of firmware and microcode is out of the way, I have paved the way to explain what really makes me mad in all of this.

From the above, we can conclude that Free software distributions do not want us to run hardware that requires non-free binary blobs of any kind – no matter how small the blob or how important the hardware may be. Now have a look at, say, the download page for Trisquel. Trisquel apparently supports 32-bit or 64-bit PCs (ie. x86-architecture, ie. AMD and Intel CPUs, ie. CPUs that require priorietary microcode to function). Where are the download links for people that have that have RISC CPUs that don’t require proprietary microcode (eg. MIPS, like the Loongson processors as used in the Lemote netbook that RMS uses)? No, Trisquel doesn’t really make any effort or seem to care about you running a 100% free software computer. To do so would mean dropping support for one of their main sponsors Think Pengiun computers, which only ship Intel x86 PCs!

If the free software guidelines were serious about avoiding non-free blobs, they should be blacklisting hardware known to disrespect user freedom by mandating blobs – regardless of how the blobs get installed, and should probably be dropping x86 architecture support. Alternatively they could go the other way and allow any non-free blobs, if they are stripped to the absolute minimum required to get hardware actually working, so end users gain the maximum possible free software experience from their hardware. Of course they wont do either of these things though. Neither having a completely free software computing experience, or having things work correctly for end users is their primary goal; it’s all about marketing.

Fun times – upgrading Xen dom0 to Wheezy

I apologise for the downtime Sunday evening. What follows is a description of the problems I ran into which caused this.

It was about 6pm. J- and I were trying to figure out some issues we had been experiencing with XMPP. I run ejabberd in a VM on my server, which I’m reasonably happy with. J- on the other hand was using a Google Talk account, but always appeared invisible on my contact list. Yet, I was clearly visible and online on her roster.

My suspicions were that it was somehow related to Google Talk – it’s been in the news that Google is breaking federation, and they have broken it (partially at least) in the past. J- sought to fix this by signing up for a dukgo.com account. Oddly, this resulted in the same strange issue.

Next, I thought I might want to investigate my own XMPP server. I was only running stock Debian Squeeze, so figured I should probably upgrade to the latest stable before spending any significant amount of time on it. After all, how long could an upgrade take? It was 6:30pm on a Sunday evening, but I also had slides to come up with for a talk at LUV Tuesday night. Surely the upgrade wouldn’t take more than about an hour?

After all the packages had been upgraded, it was time to reboot the instance into a new kernel. That’s when I ran into my first problem – the instance refused to boot. It seemed that pygrub, which is what I was using for a boot-loader, was unable to parse the newly generated grub.cfg file.

Pygrub is a part of my dom0, which also was running Squeeze. My thinking was that hopefully if I upgraded the dom0 to Wheezy too, it will support the new Grub configuration format. Worth a shot. And so I began the dom0 upgrade.

After all the packages on the dom0 were upgraded, it was now time to reboot and cross my fingers. Thankfully, the reboot was successful. I was very glad to see the processes of runlevel 2 initiate. Very glad… except one of my instances refused to boot. Not just any instance, but my firewall! No more Internets! Panic started to settle in.

The ADSL modem connected to the server via USB. The entire USB controller was using xen-pciback for device pass-through to to the guest. This functionality was no longer working – the dom0 decided that the device was no longer available and could not be passed through. If it could not be passed through, the firewall instance refused to start (and wouldn’t be very useful even if it did). This was starting to be a real annoyance. Now I had to unload the kernel modules, play with /sys entries to free up the device, and then boot the firewall again. There was some tinkering with dom0’s Grub kernel parameters along the way, but eventually I got the firewall to boot *and* see the USB device. It took hours, but I finally did it. Sorta.

There were a ton of USB driver error messages in dmesg output of the firewall. The USB stack was failing and was unusable. I tried various pass-through configurations, but ultimately I was not able to get the guest to use any kind of USB device. Seems like some kind of regression.

At this point it was getting quite late, and I wasn’t in the mood for playing around any longer. I just wanted things working again – and preferably without having to undo all my work by restoring from backups. Fine, I thought. If I can’t pass through the USB controller, I’ll just install a spare PCIe NIC and pass through that instead. After all, my modem supports connectivity from either USB or Ethernet, and it doesn’t matter to me which.

Although this seemed like a good approach, and I had the hardware to spare, things once again didn’t work out. The dom0 kernel wanted to load the device drivers of this hardware for itself, and I would have to prevent that if I were to be able to use that in the guest. The kernel driver module was r8169. I started creating entries in /etc/modprobe.d/ and rebuilding the initramfs, which is when it hit me… this is the same kernel module as used by the other integrated network port in the server – which I very much need. If I prevent this from loading, I won’t be able to remotely connect to the server any more via my LAN!

It was somewhere in the early hours of Monday morning, I had no Internet access (except through tethering with my N900), I had to go to work the same day, I had not had much sleep the night before, I had slides for a presentation that needed to be created, and I knew J- would kill me if I left the server in this broken state for too long. Further, I wasn’t sure how to proceed, and (to add insult to injury) my N900 battery just died.

I checked the server, and observed that it had two unused PCI slots. Thankfully my home server runs on an old budget motherboard that still supported them, as I figured I could scrounge up an old PCI NIC or two. After pulling some old boxes out of storage, I did indeed find spare PCI NICs. The first one I tried required yet another r8169 kernel module, but then I found an old PCI NIC that was gigabit and had heatsinks on it! I couldn’t see what it was under the heatsinks, but given that the other chipsets were bare, it seemed it would probably be something different. Turned out to be some kind of National Semiconductor NIC. No idea where I brought it from or how long I have had it for, but it proves that sometimes it really does pay to keep old crap. :)

So, after installing it, messing around a bit with /etc/modprobe.d/ rebuilding initramfs, tinkering with the dom0 kernel parameters to provide appropriate device-specific xen-pciback parameters (because I’d forget about them if they weren’t in /proc/cmdline), changing the firewall VM configuration profile, etc… my Internets were back.

Unfortunately, even as I write this I still have not had time to go back and investigate the original issue – J- is still invisible to me in my roster when she should appear as online.

My letter to Humble Bundle

Guys,

Honestly, I could not believe you guys did this when I read the news on Slashdot. I thought no way, get outta here, this is some kind of joke..

The Humble Bundle has always had the tag-line “Pay what you want, DRM free cross-platform and support charity” yet you’ve made the decision to abandon 3 of those 4 core values to your brand.

I don’t game any more under Windows, I do care a lot about DRM, and as if all this wasn’t already bad enough you have also dropped the ability to support the EFF – my preferred charity.

My wife and I have purchased many bundles in the past. I’ve always told my friends and colleagues to check out the awesome bundles you have put together, but this will happen no longer. I will make sure that all the people I have recommended the Humble Bundle to are aware of what has happened today.

Even if you appear to go back to your previous-style bundles, you have lost my trust. I can’t promote or support a brand that isn’t true to the ideals and values that attracted me in the first place.

StatusNet now a part of System Saviour

Last week, the FSF dented about a MediaGoblin fund-raiser. Shortly after, Ben sent an email out to the FSM mail list indicating that he had used the service in the past and found himself donating. A couple of days later, a FSF e-mail hit my inbox pressuring me some more.

The funny thing is that whilst I’ve heard of the project, I don’t fully understand how it works and why I would use it. After all, if it’s just for sharing images I would either add them within WordPress, or otherwise simply do this by scp’ing them to a directory my server and link to them as required. This functionality works fine with my N900 as well, although clearly posting images online is not a service I have much demand for. Heck, not a week goes by that I don’t just use elinks for something.

Perhaps I’m not the target audience, but I’m probably also misunderstanding what MediaGoblin is all about. How does it compare to say ownCloud? The best way to understand it is to take it for a spin. Let’s take a look at the documentation… they compare it to Identi.ca and Libre.fm right off the bat. Wait a second… I use Identi.ca a lot but I’m not running it on my own hardware right now. Despite this I’m deploying some Goblin to my server that I don’t really understand? Time to change priorities.

What followed was me spending the rest of the day re-organising my DomU machines, web server configurations and finally installing my own StatusNet micro-blog at http://micro.systemsaviour.com/.

So far I haven’t customised my install too much. I haven’t even replaced the Status.Net heading with the site name, but can do that all in good time. As my usage of Identi.ca was previously almost exclusively limited to other Identi.ca accounts, I had not until now had a good chance to see for myself how well the federation features worked. While not perfect (eg. no direct messaging functionality, documented bugs preventing messages to groups sometimes appearing, etc.) I think it will live up to my expectations and be sufficiently useful to me to want to make the switch away from my boltronics@identi.ca account.

As for MediaGoblin, I’ll have to look at that again another weekend to see if I can figure out how it might be useful. As for Libre.FM, I don’t think I’ll be hosting my own GNU FM server any time soon given it doesn’t appear to have federation capabilities currently which would pretty much restrict its usefulness to scrobbling (which I don’t really care much for anyway). I have decided that I also want to run my own Gitorious install sooner rather than later. Too much cool tech… arrggh!!

October 28th 2012 update:
As expected, I have since spent some time messing around with MediaGoblin. The results are visible from the Images menu button above. I have yet to create a custom theme, and do not have registrations enabled – with no plans to do so; at least not until the software matures.

Introducing ‘usbraid’ – for efficient USB RAID management.

Those of you who know me well also know that I’ve been doing geeky stuff for a long time, so it shouldn’t come as a surprise to learn that (while I wasn’t the first person to do so) I have been using USB RAID arrays for a few years. Unlike the linked articles however, I have generally had a practical reason for using one.

The first practical USB RAID array I ran was in RAID0 – attached with tape to the back of my Asus EeePC 701 laptop screen. The USB RAID storage was actually considerably faster than the 4Gb of internal non-upgradable flash the netbook came with.

Currently however, I use a USB RAID array to store my most confidential files on – things like my BitCoin wallet, password manager databases, important documents and the like. Why would I do that? Security and convenience, primarily. I wanted a backup solution with redundancy in case one of the drives failed, so that rules out my spare laptops which all only house a single HDD (without reaching for a soldering iron, anyway). I also don’t want to store such confidential information on my home server which is running 24×7 and always connected to the Internet – it exposes this data to unnecessary risk. No, ideally the storage device to be used for these specific backups should be only powered up when the data is actively being used.

Most USB HDDs you can buy would fail to meet the ‘redundancy’ requirement, but there are devices such as the Western Digital My Book RAID1 enclosures and the like. Unfortunately these generally house 3.5″ HDDs – overkill for the few small files I need to store securely. There are other non-apparent problems with these too:

  • The sheer bulk and weight of some of those solutions would make them very susceptible to damage if accidentally dropped.
  • They tend to rely on proprietary software and/or HDD controller chipsets which may not be easy to replace if they fail.
  • Generally, such devices are not terribly cheap.
  • In my experience, putting much trust in consumer-grade external hardware devices is just asking for trouble.

So there you have it – a very practical reason why I require a USB RAID array. Running five 1Gb sticks in RAID6, permanently duck-taped to a cheap USB hub solves all of the above problems, is silent, tougher, smaller, lighter, cheaper, more easy to replace (can just buy any other USB hub off the shelf – or in a pinch not even use a hub if a desktop has enough USB ports), and would require at least 3 drives (more than half the array in my case) to fail before losing data. As far as the hardware part of the solution goes, it’s perfect!

Of course, the software side of the story is a little more tedious. I actually run LVM to manage my partitions on top of my RAID device, so having to manually start a RAID array by specifying the device nodes of each USB key, setting the LVM volume group to ‘available’, creating mount points and then mounting each filesystem I’m interested in each time I want to use my array is actually quite a lot of work. After a bit of practice you can go from connecting the device to having the filesystems mounted in about a minute, but even that is far too long IMO – especially when you consider that you also need to do a number of steps to reverse all of this when you’re finished with the filesystems later.

A few months ago, I bit the bullet and spent a few hours writing my own solution which I now license to all (under the GPLv3): usbraid. I’ve spent most of this morning updating it to be less specific to my system and adding the included documentation, so hopefully it’s useful to somebody who might be in a similar situation. You need to know a bit about mdadm and LVM2 if you are considering making your own USB RAID setup and using this tool, but hopefully it’s not too difficult. Once setup as described in the included README file, you should just be able to simply run:

$ sudo usbraid -m
$ sudo usbraid -u

to mount and unmount your USB RAID filesystems.